Textures
What IS PBR Texture: The Key to Realistic 3D Graphics
Are you interested in learning more about the world of 3D graphics? If so, then you may have heard of a PBR Texture. But what is it and how can it be used in your projects? In this blog post, we'll explore what a PBR texture is and how you can incorporate them into your projects.
- Definition of PBR Texture
- Importance of PBR Texture in 3D Graphics
- Understanding PBR Textures
- Advantages of Using PBR Textures
- Creating PBR Textures
- Understanding Texture Maps
- Techniques for Creating PBR Textures
- Tools for Creating PBR Textures
- Applications of PBR Textures
- Video Games
- Film and Animation
- Architecture and Design
- Conclusion
Definition of PBR Texture
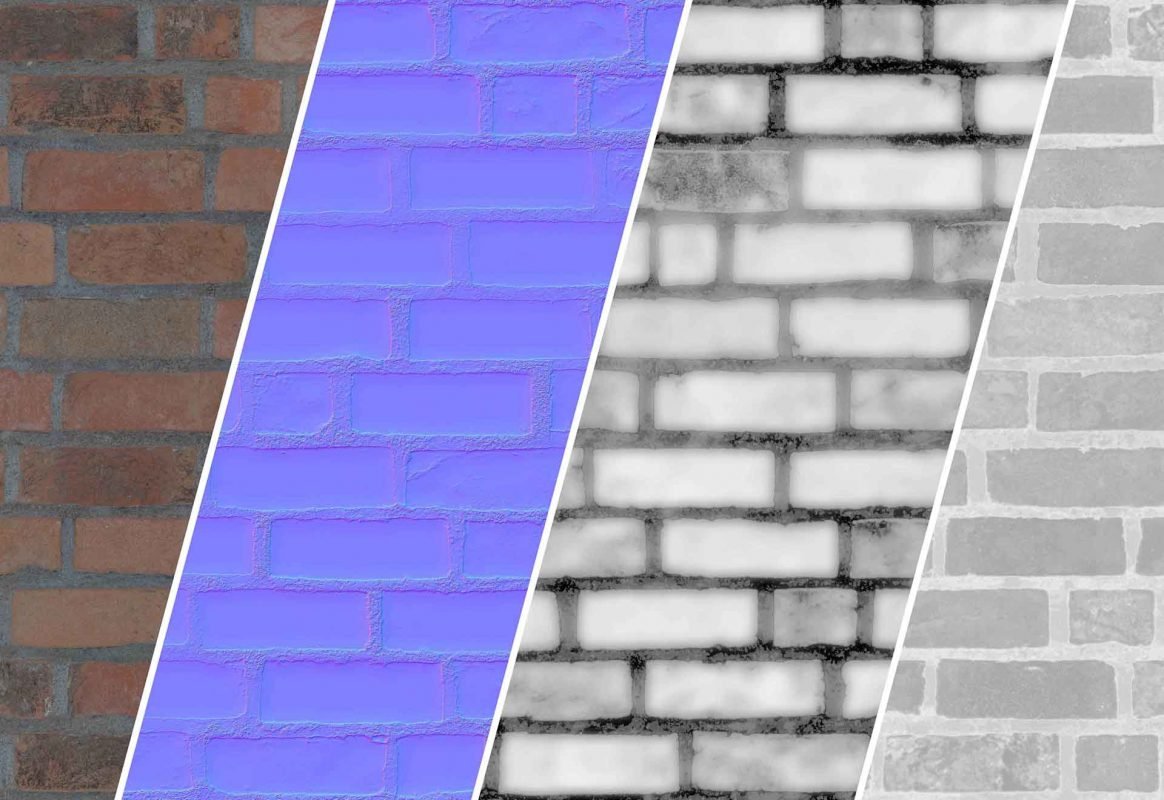
PBR Texturing is the process of creating digital two-dimensional images which store surface and color information that is used to project onto a 3D object. PBR stands for Physically Based Rendering and is a loosely defined framework for storing data that is needed to recreate real-world material in a digital 3D environment. Depending on which aspect of the 3D modeling workflow is being discussed, PBS can refer to shading concepts while PBR refers to rendering and lighting. By using PBR Textures, 3D artists can create materials that look more realistic and mimic the physical properties of real-world materials such as metal, wood, glass, or fabric. PBR Textures are created by combining different texture maps such as albedo, normal, roughness, displacement, and specular maps. Each texture map provides a different kind of information about how the material should look when rendered in 3D. By combining these texture maps together, artists can create detailed materials with realistic lighting and shading effects.
Importance of PBR Texture in 3D Graphics
Understanding PBR Textures is important for those working in 3D graphics, as it enables them to create more realistic textures that accurately simulate the interaction of light with surface matter. PBR Textures have a lot of advantages, such as increased time-saving, quality, photorealistic render results, scalability, and compatibility across different rendering engines. PBR materials allow for more realistic lighting and shading, providing a more faithful representation of a material's behavior in different lighting conditions. Additionally, PBR Textures offer increased flexibility as they can simulate any existing material and provide better compatibility across different rendering engines. All of this makes PBR Textures an invaluable tool for those working in 3D graphics.
Understanding PBR Textures
Understanding PBR Textures is an essential part of creating 3D graphics. These textures provide more accurate lighting and shading models and allow for greater flexibility in the creation of 3D objects. PBR Textures are created by measuring surface values and applying lighting and shading models to them. This allows for realistic lighting and shading effects that can be used across different rendering engines. To create these textures, various techniques such as texture maps, material maps, normal maps, and displacement maps can be used. The use of these textures has allowed for increased realism in 3D graphics and improved compatibility between different rendering engines.
What is Physically Based Rendering (PBR)
Physically Based Rendering (PBR) is a computer graphics approach that seeks to render images in a way that models the flow of light in the real world. It is based on scientific equations and physics-based rendering techniques that aim to replicate the behavior of light in the physical world. PBR materials are a virtual material pipeline that can simulate any kind of material, from metal to wood to cloth and more. This helps create realistic 3D renders with accurate lighting and shadows. PBR also allows for increased flexibility, as it works across different rendering engines with better compatibility. By understanding texture maps and using the right techniques, creators can create stunning PBR Textures for their projects.
Advantages of Using PBR Textures
PBR Textures offer several advantages for those looking to create realistic visuals. Compared to traditional textures, PBR Textures provide increased flexibility and compatibility across different rendering engines. They also allow for realistic lighting and shading, giving the user greater control over the final image. Additionally, PBR Textures are easier to create than traditional textures, as they require fewer tools and techniques. As a result, users can quickly generate high-quality visuals with minimal effort. With all these advantages, it’s no wonder that many developers are turning to PBR Textures when creating their projects.
Realistic Lighting and Shading
PBR Textures are designed to simulate the way light interacts with different surfaces and materials, allowing for realistic lighting and shading. This means that any surface rendered using PBR Textures will appear more lifelike and accurate than one that is rendered without them. This is because PBR Textures use a more precise method of calculating how light interacts with the surface, taking into account factors like the angle of incidence, the length of the path taken by the light, and the reflectivity of the material. This allows for far more accurate simulations of shadows, highlights, and reflections. With PBR Textures, you can achieve photorealistic render results in much less time than with traditional methods.
Increased Flexibility
PBR Textures allow for increased flexibility when it comes to creating realistic lighting and shading. The ability to mix and match different texture maps, as well as adjust the intensity of each, gives the artist greater control over the final look of the scene. This not only allows for more accurate material textures but also provides a level of control that can be difficult to achieve with traditional texturing methods. Additionally, PBR Textures are compatible with many different rendering engines, making them even more versatile when it comes to creating realistic lighting and shading effects.
Better Compatibility Across Different Rendering Engines
One of the advantages of using PBR textures is their compatibility across different rendering engines. This means that the same texture can be used in a variety of different applications, from video games to film and animation. This is possible because PBR textures are based on physically based rendering, which takes into account the physical properties of materials and lighting in a realistic way. This allows for the same PBR texture to be used in different 3D applications without the need for additional modifications or adjustments. As a result, PBR textures are highly versatile and can be used in a variety of situations and applications, making them a great choice for those who want to create realistic visuals quickly and easily.
Creating PBR Textures
Creating PBR Textures is a complex process that requires both technical and artistic skills. While the rules of physics are handled by the shader, artists must create maps that are guided by the physical properties of the material being simulated. This includes understanding different texture maps, such as Diffuse, Normal, Roughness, and Metallic maps, which all have a different purpose in creating a realistic PBR material. Artists also need to consider techniques such as baking ambient occlusion and other lighting data into their textures for increased realism. There are also several tools available for creating PBR textures, from Adobe Photoshop to Substance Painter, which can make the process easier for those with less experience. Creating PBR textures takes time and practice to perfect, but when done correctly they can create truly stunning visuals that bring the 3D model to life in an incredibly realistic way.
Understanding Texture Maps
Texture maps are essential to making 3D images look realistic and they come in many different types. Diffuse maps are used to control the color of the object, normal maps add surface details and create a sense of depth, roughness maps create a matte/glossy effect, ambient occlusion maps define how much light is blocked from certain areas, metalness maps give a metallic appearance, emissive maps make objects glow, specular maps define how much light is reflected from an object, and displacement maps alter the geometry of an object. Each texture map serves a purpose in giving the 3D image its desired look.
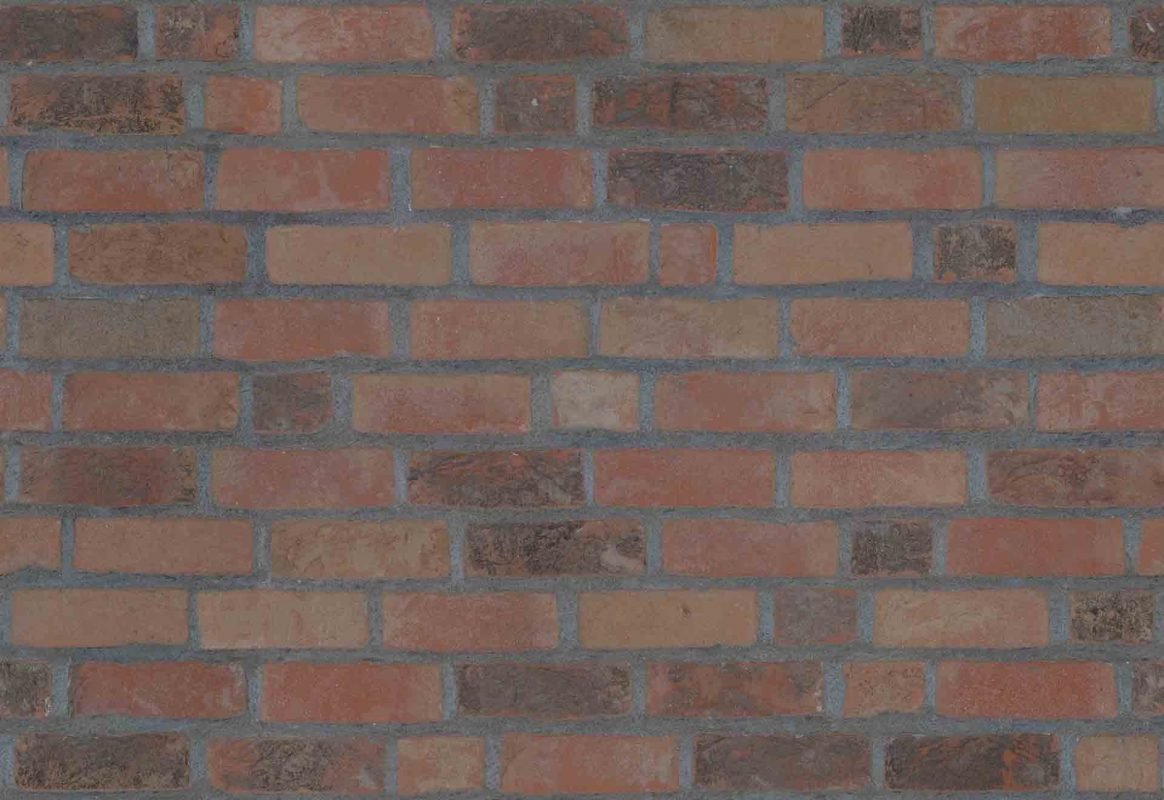
Diffuse Maps
Diffuse Maps are the most common type of texture map used in 3D rendering. They provide the color and pattern to the object, with the bitmap image being wrapped onto the 3D geometry surface while displaying its original pixel color. Diffuse Maps are essential for making 3D images look realistic, and can be used to create special effects, patterns, or repeating textures.
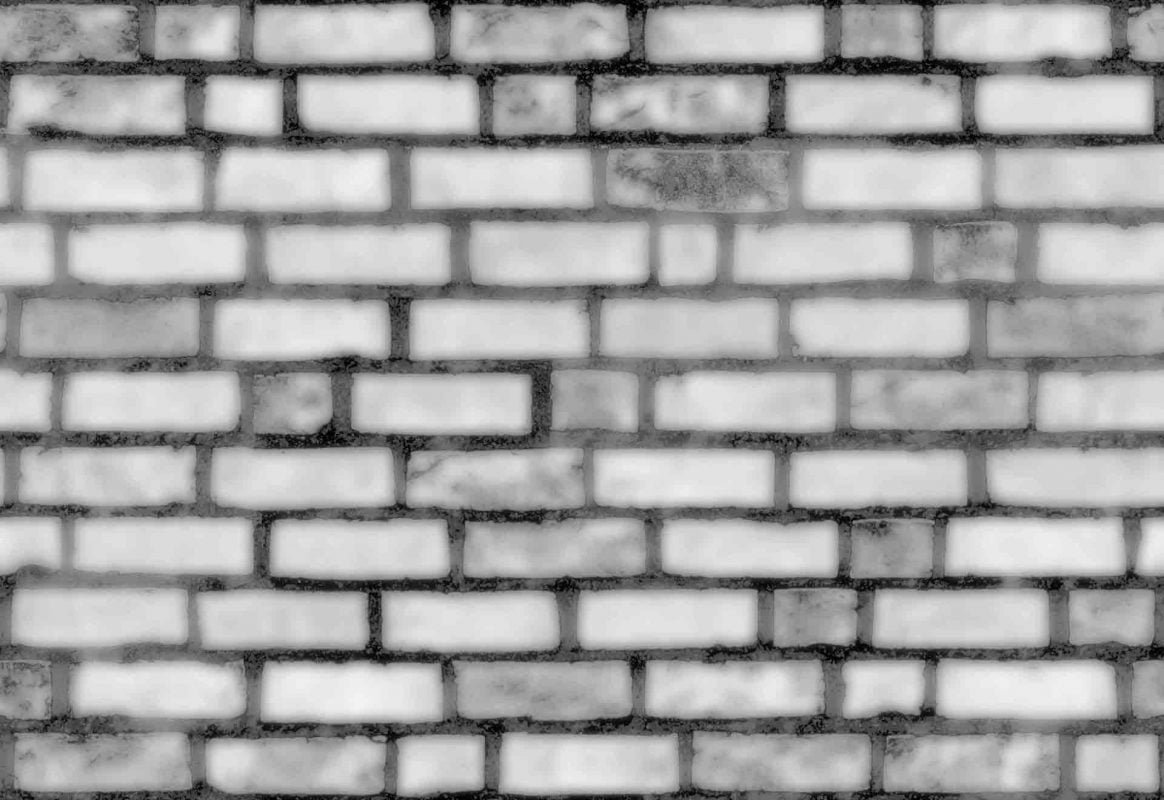
Roughness Maps
Roughness maps (also known as Gloss Maps) are used to control how light is scattered across the surface of a 3D model. By adjusting the Roughness Map, users can achieve varying degrees of shine or glossiness on the model’s surface. A 0 value for Roughness will result in a very shiny surface, while higher values will create more matte and textured surfaces. This type of map is often used in conjunction with other texture maps such as Diffuse Maps, Normal Maps, Ambient Occlusion Maps, Metalness Maps, Emissive Maps, and Specular Maps to create a realistic look and feel for the model.
Normal Maps
Normal maps are an essential type of texture map used to create the illusion of depth and texture on the surface of a 3D model. They are used to add details to a 3D model without having to actually increase the polygons and complexity of the model. Normal maps allow for finer details such as bumps, scratches, and dents to be added to a 3D object that would otherwise not be possible with diffuse or bump maps. Normal maps are often used in combination with other texture maps such as diffuse, roughness, ambient occlusion, metalness, emissive and specular maps to create realistic 3D objects with added detail.

Displacement Maps
Displacement maps are a type of texture map that can be used to add depth and detail to 3D modeling. They are created by taking a grayscale image and mapping it directly onto the surface of the model. The displacement map will then manipulate the surface of the model, creating bumps, ridges, or cavities that would not be possible with just a simple diffuse map. Displacement maps are used to create detailed textures, such as fur or fabric, or to create effects like water ripples or terrain features. They can be used in combination with other types of texture maps for more detailed and realistic results.
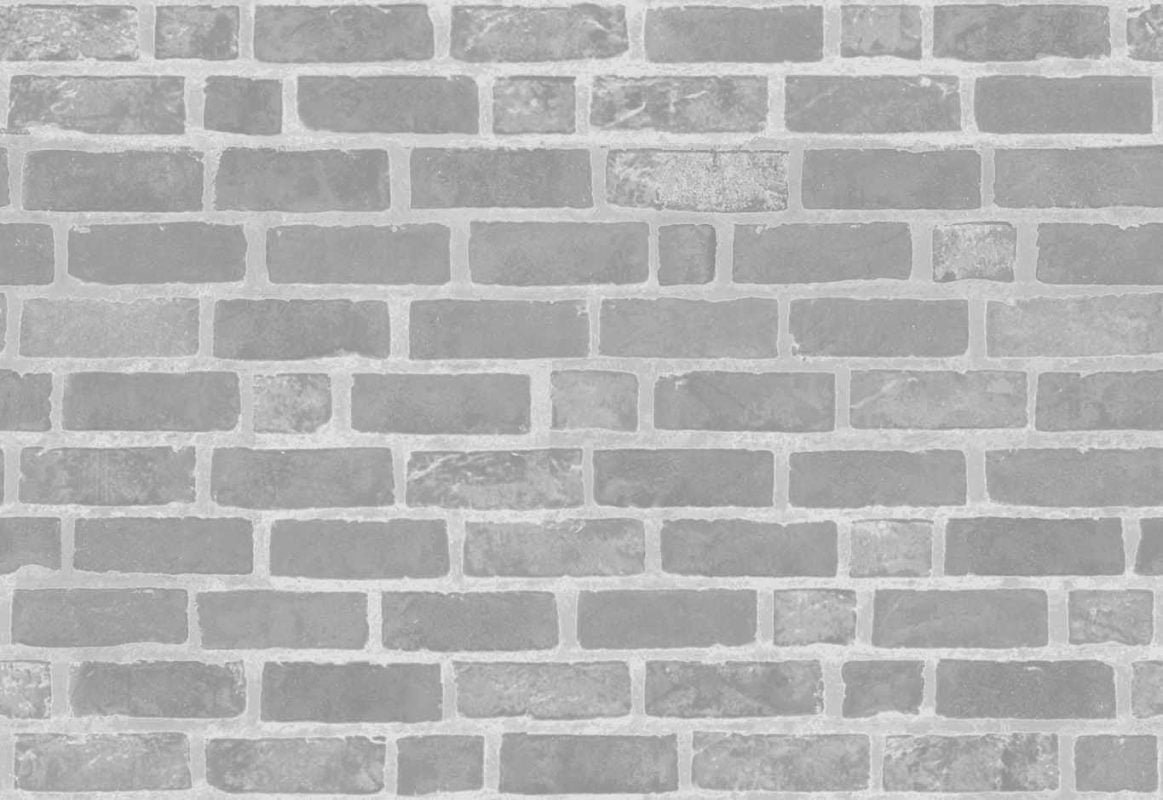
Ambient Occlusion Maps
Ambient Occlusion (AO) maps are a type of texture map used to add realism to 3D modeling. It is used to define shadows and dark areas in 3D modeling, giving it a more realistic look and feel. AO maps are used in combination with diffuse, normal, roughness, metalness, and specular maps to create the most realistic results. AO maps are also referred to as occlusion maps or shadow maps, depending on the specific application. They can be used on objects that have a lot of small details, such as trees and rocks, to add depth and realism to the overall scene.
Metalness Maps
Metalness maps are an important texture map for creating realistic 3D images. They are used to control the level of light reflection on a 3D object and can be used to create realistic metallic materials. The metalness map is usually black and white and the brighter areas of the map will appear more metallic, and the darker areas will appear more non-metallic. Metalness maps should be used in conjunction with other texture maps such as diffuse maps, normal maps, roughness maps, ambient occlusion maps, emissive maps, and specular maps for the most realistic results.
Emissive Maps
Emissive Maps allow for the creation of light sources in a 3D modeling, adding a more realistic look to the final product. They are particularly helpful when it comes to creating effects such as neon signs and night scenes. This type of map is often used in combination with other maps, such as Diffuse and Normal Maps, to create a more dynamic lighting effect.
Specular Maps
Specular maps are used to control the reflectivity of an object in 3D. This is achieved by applying a black-and-white image to the surface of the 3D modeling. These maps are often used in non-PBR materials, as they help to determine the shininess or reflective properties of the object. With this map, you can create a glossy or matte effect, depending on how much light the object should reflect. Specular maps can be used along with other types of texture maps, such as diffuse maps and normal maps, to create more realistic-looking 3D modeling.
Techniques for Creating PBR Textures
Creating PBR textures can be a complex task, but with the right techniques and tools, it can be accomplished with relative ease. Several techniques can be used to create realistic PBR textures, such as baking, sampling, and painting. Baking is the process of taking a 3D model and rendering out a texture map from it. Sampling involves taking a sample of an existing texture map and applying it to a 3D model. Painting is the process of creating textures from scratch using digital painting tools. Each of these techniques has its own advantages and disadvantages, so it's important to understand them before using them in your projects. Once you have the techniques down, you can use a range of tools to create PBR textures quickly and accurately. These include dedicated 3D texture generators such as Substance Designer or Quixel Megascans, as well as more general-purpose painting programs such as Photoshop or Krita. With the right approach and tools, creating realistic PBR textures is within reach for any artist.
Tools for Creating PBR Textures
When it comes to creating PBR textures, there are a variety of tools available to help you achieve the desired look. From procedural nodes to dedicated software, the options are vast. Modo's PBR loader is a great tool for importing textures for use in PBR materials and has become a popular choice for many 3D artists. There are also many dedicated texture-creation programs, including Substance Designer and Quixel Mixer, where users can create custom materials from scratch. Additionally, there are many free online tools available for creating textures and materials—most notably, the PBR Texture Generator from Allegorithmic. Regardless of your choice of tool, it’s important to understand how texture maps work to create realistic PBR textures.
Applications of PBR Textures
PBR textures can be used in many applications, from video games to film and animation, architecture, and design. Video games, in particular, can benefit from PBR textures as they allow for realistic lighting and shading with increased flexibility and compatibility across different rendering engines. In film and animation, PBR textures can help create stunning visuals that accurately depict the physical properties of materials. For architecture and design projects, PBR textures can provide an accurate representation of surfaces that can be used to better visualize a project before it is built. Regardless of the application, PBR textures are highly versatile and user-friendly, making them a great tool for creating realistic visuals.
Video Games
Video games are one of the most popular applications of PBR textures. This is due to the realism they can achieve while still maintaining performance, allowing game developers to create rich, immersive worlds with stunning visuals. With PBR textures, game developers can create realistic lighting and shading effects that look great on both PC and console platforms. Additionally, the increased flexibility of PBR textures gives game developers more control over their game’s visuals, allowing them to create a unique look for their games. Finally, with PBR textures being compatible across different rendering engines, game developers have a wider range of options when it comes to creating their games.
Film and Animation
PBR textures are used widely in film and animation to create realistic and immersive visuals. By utilizing the different components of a PBR texture, filmmakers can create life-like characters, objects, environments, and more. This is possible because PBR textures capture the natural physical properties of materials, such as albedo, smoothness, and height. Additionally, the use of PBR textures ensures that the final product has increased compatibility across different render engines, making it easy for filmmakers to produce consistent results. Furthermore, using PBR textures can also result in better lighting and shading since they are designed to accurately simulate how light interacts with physical materials. In short, PBR textures are ideal for creating realistic visuals in film and animation.
Architecture and Design
Architecture and design benefit greatly from the use of PBR textures. The realistic lighting and shading provided by PBR textures can help bring an otherwise static scene to life. The increased flexibility of textures also allows for more creative exploration in a project, allowing designs to be tailored to specific needs. Additionally, better compatibility across different rendering engines makes it easier to share a project between different programs, making collaboration more efficient. PBR textures are an invaluable asset in architecture and design projects, providing designers with the tools they need to make their projects stand out.
Conclusion
Physically based rendering is an important tool for producing realistic visuals in 3D applications, and PBR textures are an integral part of this process. By using the correct texture maps and input values, PBR textures can lead to more accurate lighting and shading, increased flexibility, and better compatibility across different rendering engines. Furthermore, PBR textures can be used in a variety of applications such as video games, film and animation, architecture, and design. Ultimately, PBR textures provide a reliable and efficient way to create realistic 3D visuals.
For How to use PBR Textures you can watch Our Youtube Channel.